Once the prep work is done (Step 1), decide which direction to lay the flooring. Running the planks parallel with the longest wall usually looks best.
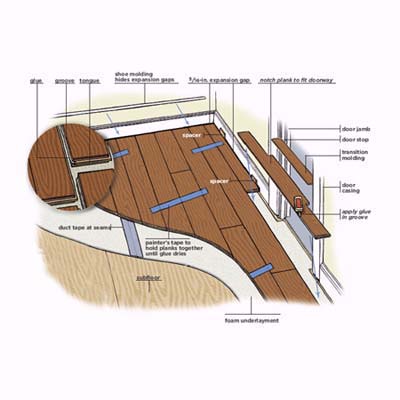
Then measure the width of the room (subtract 5/8 inch to account for the expansion gap on both sides) and divide by the width of the flooring you’ve chosen to calculate how many courses of planks will be needed. Chances are you’ll need to rip, or trim lengthwise, the last course to fit. If your calculation results in a final course that’s at least 1 ½ inches wide, then the first course should be a full-width plank. But if the last course is narrower, rip the first course down to ensure the last course will have a pleasing width.
1. Trim the door casings
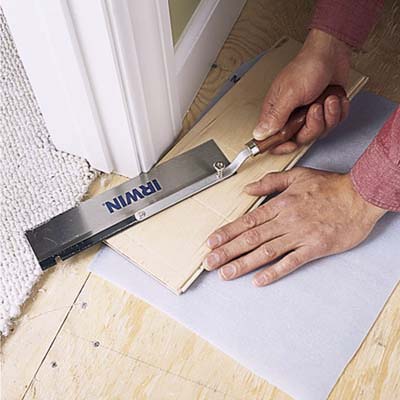 Use a flush-cut dovetail saw to trim the bottom of the casing at all doorways so that the flooring will slide underneath.
Gauge the height of the cut by laying down a piece of foam underlayment and a piece of flooring (upside down so the saw won’t scratch the finish).
Then hold the saw flat against the plank and carefully make the cut.
 2. Install the foam underlayment
Vacuum the room, then unroll the foam underlayment.
Cover the entire room with a single layer, trimming it to fit with a utility knife and butting the seams together.
Seal the seams with duct tape.
3. Install the first course
 Lay down the first plank with its grooved end in the corner against a spacer block. Also place spacers along the starting wall. As you set the flooring, always keep the tongues facing out and cut ends against a wall.
To fill in the pieces in the first course, place a spacer against the wall, and measure from it to the last plank installed.
Mark this measurement on a new plank, starting at the grooved end so it will mate with the tongue of the last plank. Cut the plank to length.
Apply glue to the end groove of the new piece, and install.
Slip a pry bar between the end of the plank and the spacer and lever the joint together. Then push the piece down in place. Remove excess glue with a damp cloth.
4. Install the rest of the flooring
 Start each course with the piece of flooring left over from the previous cut (cut end to the wall), as long as it is more than 8 inches in length. This will keep the joints staggered. Remember to place spacers against side walls before you put down a plank.
Squeeze glue into the groove of the plank in one continuous bead, then slide it up against the previous row. Set a wood block against the outside of the plank, and tap it with a hammer to bring the planks tightly together.
Measure from the plank to the end of the row and finish the course as detailed in Step 3. Continue installing planks in this manner, one course at a time. Every four to six courses, use blue painter’s tape to keep the joints tight while the glue cures.
5. Measure for the last course
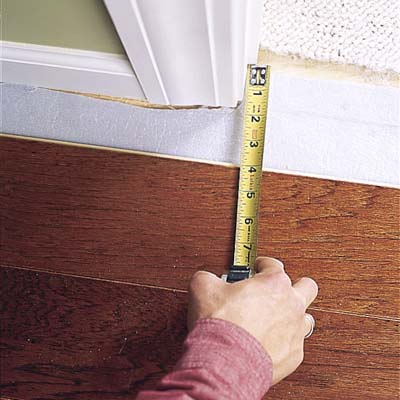 When you reach the final course, measure the width needed for the last plank. Again, measure to a spacer placed against the wall, to account for the expansion gap.
A plank that runs across a door will have to be notched to fit inside the doorway. To determine its width, measure to the closer edge of the doorstop molding.
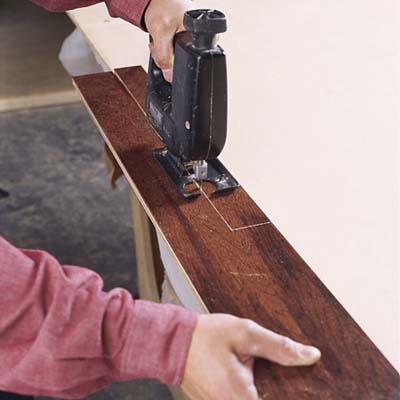 6. Rip the plank to width
Use a jigsaw to rip the plank to width and to cut the doorway notches, above center. Cut the plank so it fits underneath the casing and reaches the doorstop. Use a fine-tooth wood blade, and cut slowly.
7. Pry in the last course
Getting this final course in requires patience and persuasion.
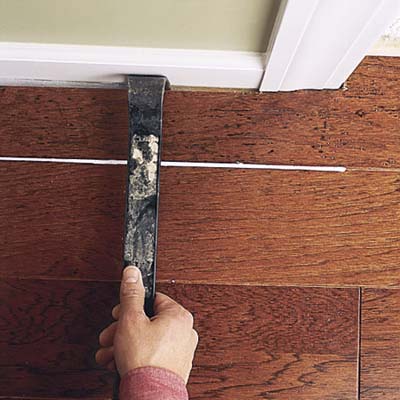
Remove the spacers on the last wall for wiggle room, then use a pry bar to pull the piece tight against the previous course. If necessary, slide the plank into place by coaxing it with the block and hammer.
Allow glue to cure at least 12 hours before removing the painter’s tape and spacers and trimming out the room with molding along the perimeter.
8. Install the finish trim
 Trim the doorstops on either side of the doorway to the height of the transition molding. Then cut a piece of transition to fit between the doorjambs.
Set the transition on the subfloor. Overlap the flooring on either side, but leave a 5/16-inch gap against the floating floor. Drill three pilot holes along its center to keep the transition molding from splitting, then fasten it to the subfloor — not the flooring — with 4d finish nails.
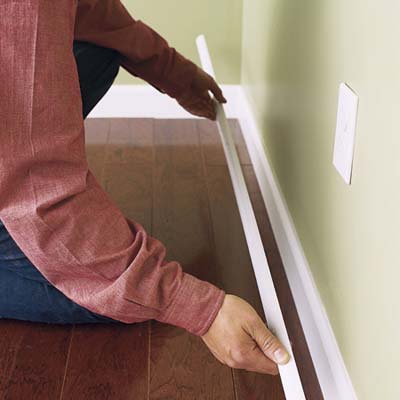
Now measure the walls for shoe molding. Try to complete each wall with one piece. If necessary, join pieces with a scarf joint.
For inside corners, use a coped joint or simply miter the two pieces. Cut miters for outside corners, too. Set the molding in place tightly against the floor. Fasten it to the baseboard — not the flooring — with 4d finish nails.


